Security Onion on Proxmox
Security Onion on Proxmox
I originally set up my homelab using Ovirt, but have since switched back to Proxmox. The reason for that is that the version of qemu that Ovirt ships with does not support the “applesmc” device that is needed to run macOS guests, whereas Proxmox does. Another benefit is that Proxmox supports running containers, while Ovirt required full virtual machines, and Proxmox is overall much faster at every day tasks like starting or migrating a VM. I kept the same infrastructure as before, including using Gluster as shared storage amongst the compute nodes.
What I want to do in this post is walk through how Security Onion is setup. I had previously used a port mirror from my Ubiquiti switch to send a copy of all traffic to a port which connected, via a USB3 Ethernet device, to my Security Onion VM. I now have a dedicated range network for running tests and practicing in.
There are some great blogs here, here, and here that helped set this up in different ways. None of them were perfect for my particular case because of my multinode setup and using link aggregation on the two NICs that are on each Proxmox node. For example, I could not use an Open VSwitch as I did not have a spare NIC to bridge the vswitch to.
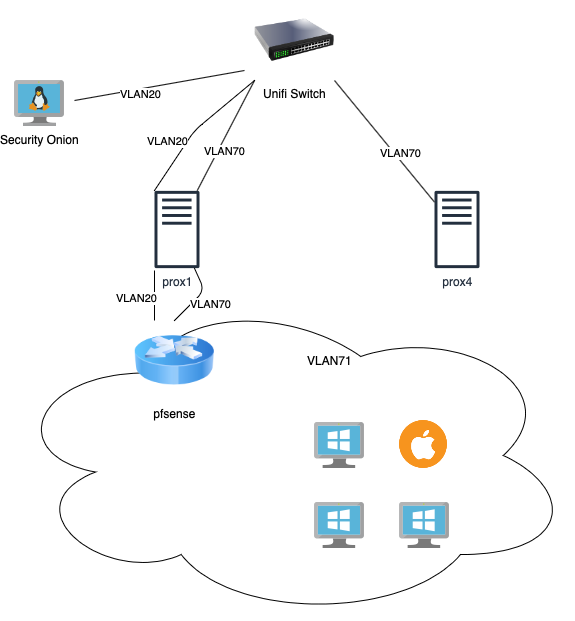
pfsense setup
 To setup pfsense, I added three NICs. The first NIC uses VLAN70, which is the VLAN for my range, and includes a Kali VM and a redirector. The second NIC uses VLAN71, which is not a VLAN known to the Unifi equipment. VLAN71 is internal to Proxmox and is for vulnerable hosts. The third NIC uses VLAN20, which is a VLAN for span traffic of VLAN71.
On pfsense, those three NICs are mapped as vtnet0, vtnet1, and vtnet2, respectively. vtnet1 is known as WAN, vtnet2 as LAN, and vtnet3 as OPT1. OPT requires special configuration for this setup. The interface is configured by going to Interfaces -> OPT1.
- Enable: Checked
- I renamed OPT1 to ONION_SPAN by editing the Description field.
- IPv4 and IPv6 Configurations were set to None, since this interface is not actually used to transmit data.
Next, I needed to create a bridge. Go to Interfaces -> Bridges -> Add.
- Member Interfaces: LAN
- Description: SPAN LAN to ONION_SPAN
- Span Port: ONION_SPAN
Now when running tcpdump -vnni vtnet2 I could see a copy of every packet seen on the LAN interface.
Security Onion Setup
My original thought was that I should simply be able to see a copy of the traffic from that span port that was just configured. However, tcpdump -vnni eth1 would only show broadcast traffic. I tried running through some of the configs from the previously mentioned blogs, but since I couldn’t use Open VSwitch, I had to find something else. This site has an example of using the tc utility to mirror traffic, so I tried that to no avail.
Looking at the interfaces on prox1, I saw the following, which indicate the VLANs in use:
1
2
3
4
5
6
7
8
18: vmbr0v70: <BROADCAST,MULTICAST,UP,LOWER_UP> mtu 1500 qdisc noqueue state UP group default qlen 1000
link/ether 70:85:c2:d0:e3:22 brd ff:ff:ff:ff:ff:ff
21: vmbr0v71: <BROADCAST,MULTICAST,UP,LOWER_UP> mtu 1500 qdisc noqueue state UP group default qlen 1000
link/ether 70:85:c2:d0:e3:22 brd ff:ff:ff:ff:ff:ff
24: vmbr0v20: <BROADCAST,MULTICAST,UP,LOWER_UP> mtu 1500 qdisc prio state UP group default qlen 1000
link/ether 70:85:c2:d0:e3:22 brd ff:ff:ff:ff:ff:ff
28: vmbr0v72: <NO-CARRIER,BROADCAST,MULTICAST,UP> mtu 1500 qdisc noqueue state DOWN group default qlen 1000
link/ether 00:00:00:00:00:00 brd ff:ff:ff:ff:ff:ff
Running tcpdump on vmbr0v20 showed a copy of my traffic, so I knew that the data was making it “up” from the pfsense VM to the hypervisor, it just wasn’t making it to the tap interface that was attached to the Security Onion VM. These devices can be further enumerated with brctl show. Looking at the help for brctl, there’s a setageing option. Matching that to this page, I tried setting that to 0 with brctl setageing vmbr0v20 0. I could now see all the traffic in my Security Onion VM 🙂
Tuning
Last is getting rid of some of my non-lab traffic that might get picked up by the promiscuous sniffing.
1
2
3
4
5
6
7
8
9
10
11
12
13
14
15
16
vim /opt/so/saltstack/local/pillar/global.sls
steno:
  bpf:
    - not udp port 5353 &&
    - not net 10.10.10.0/24 &&
    - not net 10.10.30.0/24
nids:
  bpf:
    - not udp port 5353 &&
    - not net 10.10.10.0/24 &&
    - not net 10.10.30.0/24
zeek:
  bpf:
    - not udp port 5353 &&
    - not net 10.10.10.0/24 &&
    - not net 10.10.30.0/24
Updated configuration 2023-06-13
After making some changes to my homelab I had to reconfigure this setup. Here’s a simplified guide for setups where Security Onion and the guest network are on the same Proxmox host.
Step 1: Create a Linux VLAN
Proxmox node -> System -> Network -> Create -> Linux VLAN Name: vmbr0.XX where XX is your VLAN tag Vlan raw device: vmbr0
Step 2: Create a Linux Brdige
Proxmox node -> System -> Network -> Create -> Linux Bridge Name: vmbr1 Bridge ports: vmbr0.XX
Step 3: Modify VM hardware
pfSense: Edit the Network Device used for the span. Bridge: vmbr1 VLAN Tag: XX
Security Onion: Edit the Network Device used for the tap. Bridge: vmbr1 VLAN Tag: XX
Step 4: Set ageing
brctl setageing vmbr1 0
/etc/network/interfaces should look like this:
1
2
3
4
5
6
7
8
9
10
auto vmbr0.45
iface vmbr0.45 inet manual

auto vmbr1
iface vmbr1 inet manual
  bridge-ports vmbr0.45
  bridge-stp off
  bridge-fd 0
  bridge-vlan-aware yes
  bridge-vids 2-4094